GitLab Runner 入門
背景知識:GitLab CI/CD
簡介
GitLab runner 是一個應用程式,其功用是運行 GitLab CI/CD 流程中的 jobs。
以下是閱讀本文之前需要了解的關鍵術語:
| 術語 | 解釋 |
|---|---|
| pipeline | CI/CD 管線(工作流程),在 GitLab 是定義於 .gitlab-ci.yml 檔案中。這個檔案又稱為 CI/CD 腳本或配置檔。閱讀官方文件:CI/CD pipelines。 |
| job | Job 是 CI/CD 腳本的最小作業單元,用來定義特定工作,例如建置、測試、部署等工作,在腳本中可能分別命名為 build、test、deploy。每一個 job 都包含一至多個命令。閱讀官方文件:Jobs。 |
接著從 GitLab 官方文件摘錄幾個基礎觀念,然後搭配一個簡單的練習來理解其運作方式。
GitLab Runners
若從「服務提供者」或「擁有管理權」的角度來看,GitLab runners 有兩種,一種是由 gitlab.com 提供的現成 runners,在官方文件裡面的說法是「SaaS runners」;另一種則是可以由我們自己完全控管的 runners,原文的說法是 self-managed runners。本文的焦點是後者。
使用 self-managed runners 時,我們需要從 GitLab 平台下載 GitLab runner 應用程式,然後把它安裝在我們自己的伺服器上,而且需要完成一個註冊程序。稍後就會看到安裝與註冊 runner 的詳細步驟。
另一方面,若依「誰有使用權限」來區分,則又可分為三種 GitLab runners:
- Shared runners:在一台 GitLab 伺服器上面的所有專案都能使用。
- Group runners:在同一個 group 及其 subgroup 中的所有 projects 都能使用。
- Project runners:僅特定專案才能使用。
GitLab Runner Executors
從名稱來看,GitLab runner 本身就帶有「執行工作」的意涵,但其實 executor 才是真正負責執行 CI/CD pipeline 中各項工作的「苦主」,而 runner 的角色與責任主要是在 GitLab 伺服器與 executor 之間傳遞訊息。
理解 runner 與 executor 的責任與關係之後,實際運用時便不難理解為什麼註冊 GitLab runner 時必須選擇一個 executor 來負責執行 pipeline jobs。
因應實際執行環境的需要,GitLab runner 提供了多種 executors 可供選擇,包括:
| Executor 類型 | 用途/說明 |
|---|---|
| SSH executor | 讓你能夠透過 SSH 來對遠端主機執行 Bash 命令。 |
| Shell executor | 運行於主機的 shell 環境,可用於執行各種簡單的腳本和命令。 |
| Parallels executor | 使用 Parallels 虛擬化技術在虛擬機中運行 jobs。主要用於 MacOS 平台。 |
| VirtualBox | 使用 VirtualBox 虛擬化技術在虛擬機中運行 jobs。主要用於 Linux 和 Windows 平台。 |
| Docker executor | 使用 Docker 容器來運行 jobs,好處是容易確保作業在一致的環境中運行,並且容易配置和清理。你可以在 runner 的組態檔案(稍後的實作練習會提到)或 pipeline 腳本 .gitlab-ci.yml 中指定要使用的 Docker image。 |
| Docker Autoscaler executor | 尚在實驗階段。是一種可根據實際作業需求(on-demand)而自動擴展的 Docker executor。 |
| Docker Machine executor (auto-scaling) | 類似 Docker executor,但它在指定的 Docker Machine 虛擬機上運行 jobs。這對於需要運行在特定虛擬機環境中的作業非常有用。 |
| Kubernetes executor | 使用 Kubernetes 叢集來運行 jobs,可利用 Kubernetes 的自動擴展和管理功能。 |
| Instance executor | 尚在實驗階段,請參閱官方文件的說明。 |
| Custom executor | 如果 GitLab 提供的 executors 都無法滿足你的需求,便可自行撰寫 Custom executor。 |
以上各 executors 的解釋,我覺得不夠清楚,也不到位。推薦閱讀兩份文件,以補本文不足之處:
- GitLab CI 之 Runner 的 Executor 該如何選擇? by Cheng Wei Chen (艦長)
- GitLab 官方文件:Executors。
Tags
你可以為 GitLab runner 加上 tags,以便在你的 GitLab pipeline 中指定對應的 tags 來「篩選 runner」。也就是說,當你的 GitLab pipeline 檔案中有為某個 job 指定 tag,那麼就只有同樣具備該 tag 的 runner 才能執行那個 job。
直接取用官方文件的範例,假設你的專案的 .gitlab-ci.yml 檔案內容如下:
job:
  tags:
    - ruby
這就表示 GitLab 只會使用具有 ruby tag 的 runner 來執行這個 job。
運作方式
- 當一個 pipeline 被觸發時,GitLab 會根據
.gitlab-ci.yml檔案中的設定來建立 job,並將 job 交給具有相同 tag 的 runner,然後再由 runner 啟動與之關聯的 executor 來執行 job。 - Executor 啟動時,會先從 GitLab repo 拉取專案原始碼到它所在的執行環境,然後開始執行 job。
- Executor 執行完 job 之後,將執行結果與 log 透過 runner 回報給 GitLab,以便呈現於 Web 管理介面,供使用者查看。若該 job 被設定成會去異動 repo 中的檔案,那麼 repo 中的變動會被推送回 GitLab 伺服器。
特定 runner 與 executor 之間的關聯,是在註冊 runner 的時候就設定好的。這在稍後的實作練習當中就會看到。
實作練習
使用 self-managed GitLab runner 所需之步驟如下:
- 在目標主機上面安裝 runner 程式。
- 選擇一個 executor。
- 註冊 GitLab runner。
- 編寫 pipeline 腳本,在腳本中使用 tag 來限定使用我們自己的 runner 來跑 job。然後實際跑跑看這個 pipeline。
以下是我的操作過程。
在目標主機上安裝 Runner
我用來練習的目標主機是 DigitalOcean 平台上的一台 Linux VM。
先登入我的 GitLab 帳號,建立一個練習用的專案。我的專案網址是 https://gitlab.com/huanlin1/test-gitlab-runner。
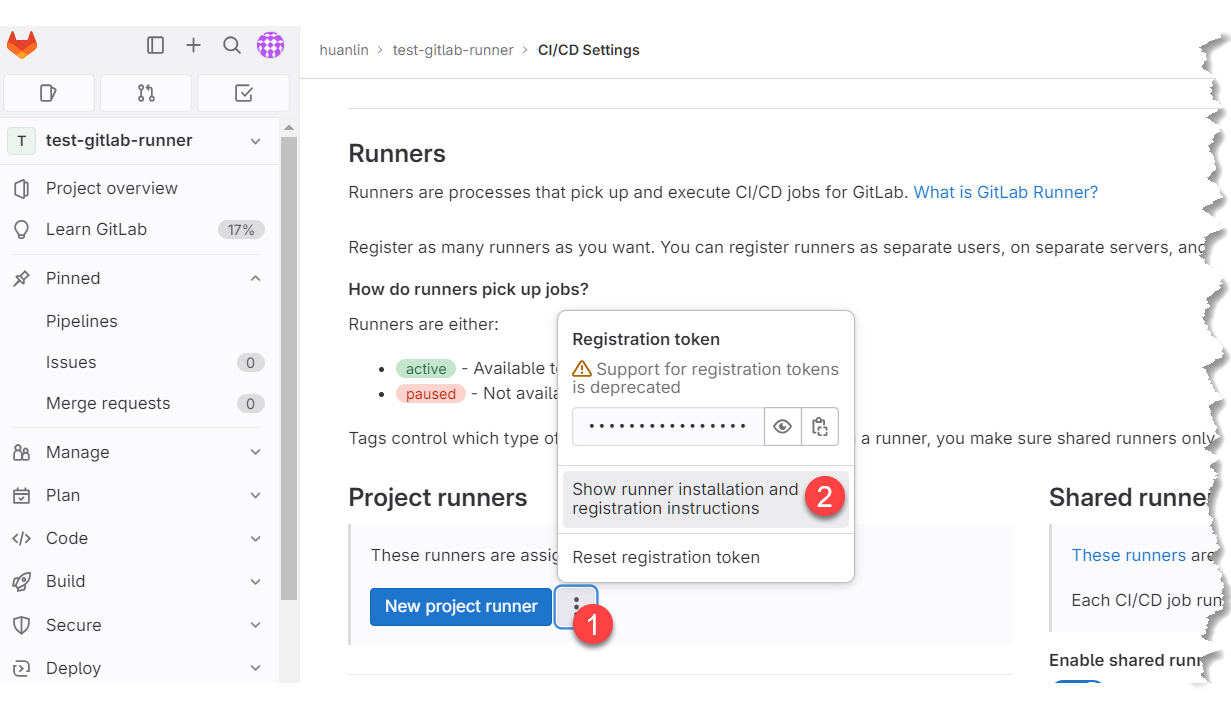
在此專案的 Settings > CI/CD 頁面展開 Runners 區塊,可以看到有左右兩個區塊,分別是 Project runners 和 Shared runners。這裡要建立的是供特定專案使用的 runner,按下圖操作:
接著會開啟對話窗,裡面有完整的安裝步驟和指令,如下圖:
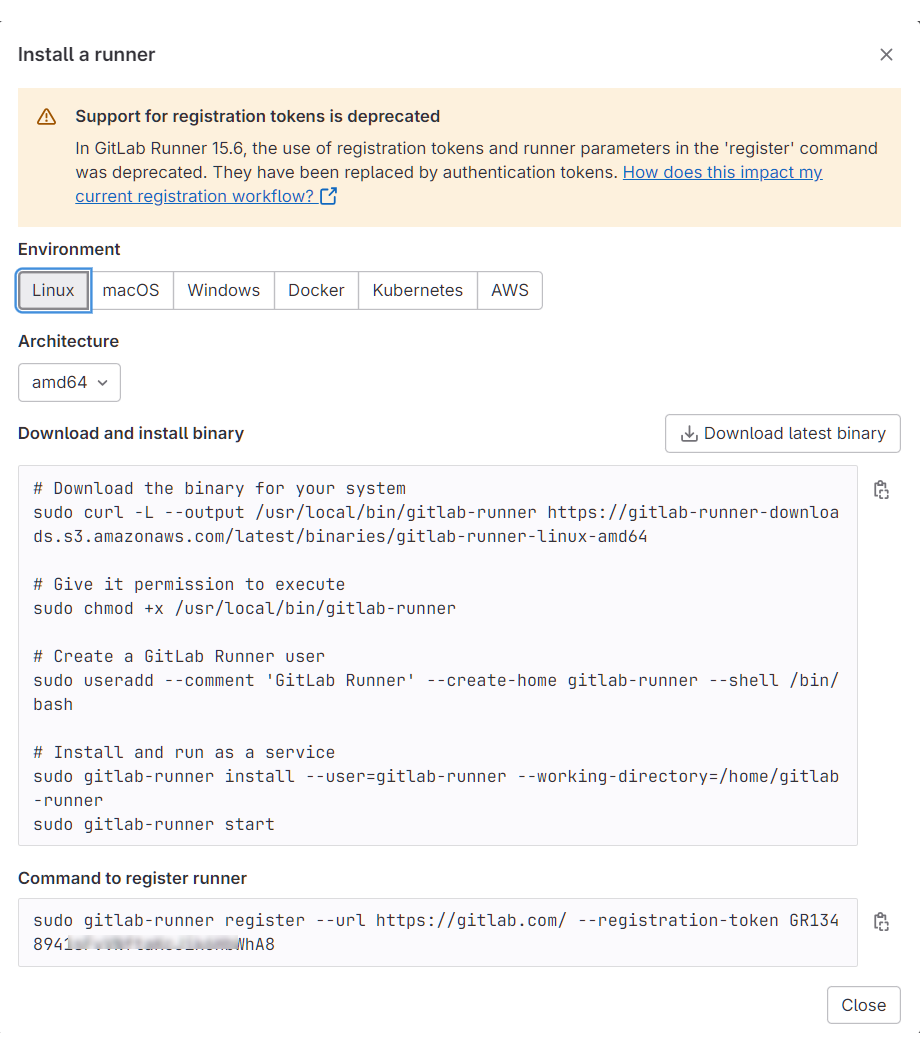
接著以 SSH 遠端登入我在 DigitalOcean 上面建立的 Ubuntu 虛擬機,然後照著上圖的指示逐一執行所有的命令,即可在 gitlab.com 註冊好一個 runner。
在 GitLab 提供的指示當中,最後一個步驟就是註冊 runner,其命令為:
sudo gitlab-runner register
執行此命令時,會先要求輸入 GitLab 伺服器的網址:
Enter the GitLab instance URL (for example, https://gitlab.com/):
[https://gitlab.com/]:
直接按 Enter,表示使用預設的 https://gitlab.com。接著會要求輸入註冊用的 token,前述安裝指示當中也已經提供了這個 token,直接貼上即可:
Enter the registration token:
GR123456789aBcDeFgHiJk987654321
接著輸入 runner 的描述:
Enter a description for the runner:
[ubuntu-s-1vcpu-512mb-10gb-sgp1-01]: My test for GitLab runner
然後輸入 tags,這裡我指定的 tag 是 python:
Enter tags for the runner (comma-separated):
python
接著要求輸入 maintenance note,可以直接按 Enter 跳過,然後就能看到註冊 runner 成功的訊息:
Enter optional maintenance note for the runner:

WARNING: Support for registration tokens and runner parameters in the 'register' command has been deprecated in GitLab Runner 15.6 and will be replaced with support for authentication tokens. For more information, see https://gitlab.com/gitlab-org/gitlab/-/issues/380872
Registering runner... succeeded                     runner=GR123456789aBcDe
雖然訊息顯示註冊 runner 成功,但還沒完,緊接著會要求我們選一個 executor。我輸入的是 "docker"(我的 VM 上面有安裝 Docker):
Enter an executor: docker-autoscaler, shell, ssh, virtualbox, parallels, docker+machine, instance, kubernetes, custom, docker, docker-windows:
docker
接會著詢問預設的 docker image 要用哪一個,就照它提供的範例中輸入 "ruby:2.7",反正稍後可以在我們的 pipeline 檔案中指定使用其他 image。
Enter the default Docker image (for example, ruby:2.7):
ruby:2.7
最後顯示 runner 註冊成功的訊息:
Runner registered successfully. Feel free to start it, but if it's running already the config should be automatically reloaded!

Configuration (with the authentication token) was saved in "/etc/gitlab-runner/config.toml"
至此大功告成。
查看 Runner 的組態檔
註冊 Runner 的最後一個步驟完成時,除了顯示註冊成功,最後還有一條訊息告訴我們這個 runner 的相關設定是保存在這個檔案:/etc/gitlab-runner/config.toml。之後有可能需要修改這個組態檔案來改變 runner 的行為,所以這裡先看一下檔案內容。
一樣是在遠端虛擬機上面執行命令:
sudo cat /etc/gitlab-runner/config.toml
結果:
concurrent = 1
check_interval = 0
shutdown_timeout = 0

[session_server]
  session_timeout = 1800

[[runners]]
  name = "My test for GitLab runner"
  url = "https://gitlab.com/"
  id = 26923949
  token = "U88hEGQAvuWz99999WtX"
  token_obtained_at = 2023-08-13T14:12:05Z
  token_expires_at = 0001-01-01T00:00:00Z
  executor = "docker"
  [runners.cache]
    MaxUploadedArchiveSize = 0
  [runners.docker]
    tls_verify = false
    image = "ruby:2.7"
    privileged = false
    disable_entrypoint_overwrite = false
    oom_kill_disable = false
    disable_cache = false
    volumes = ["/cache"]
    shm_size = 0
如果想要用 shell 來跑 pipeline 的 jobs,可以修改檔案中的 executor = "docker",把 "docker" 改成 "shell"。
確認 Runner 是否正常運行
Runner 註冊完成後,可用以下命令來確認這個它是否順利運行:
sudo gitlab-runner verify
結果:
Runtime platform                                    arch=amd64 os=linux pid=55771 revision=674e0e29 version=16.2.1
Running in system-mode.

There might be a problem with your config based on jsonschema annotations in common/config.go (experimental feature):
jsonschema: '/runners/0/docker/ulimit' does not validate with https://gitlab.com/gitlab-org/gitlab-runner/common/config#/$ref/properties/runners/items/$ref/properties/docker/$ref/properties/ulimit/type: expected object, but got null

Verifying runner... is alive                        runner=U88hEGQAv
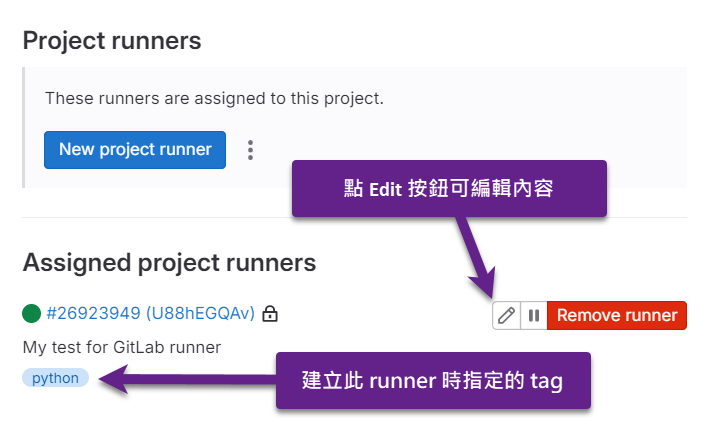
然後,回到專案的 Runners 設定頁面,重新載入頁面就能看到剛剛新建立的 runner:
運行 Pipeline 並查看 Log
底下是我的專案的 .gitlab-ci.yml 檔案內容:
image: python:latest

default:
  tags:
    - python

variables:
  USERNAME: michael

stages:
  - build
  - deploy

build-job:
  stage: build
  script:
    - echo "Compiling the code..."

deploy-job:
  stage: deploy
  script:
    - echo "Deploying the app..."
    - python3 --version
    - echo "Using credential - $USERNAME, $PASSWORD"
    - echo "App deployed successfully."
更新此檔案之後,GitLab 會立刻執行此 pipeline 所設定的工作。從專案的 Pipelines 頁面可查看執行結果:
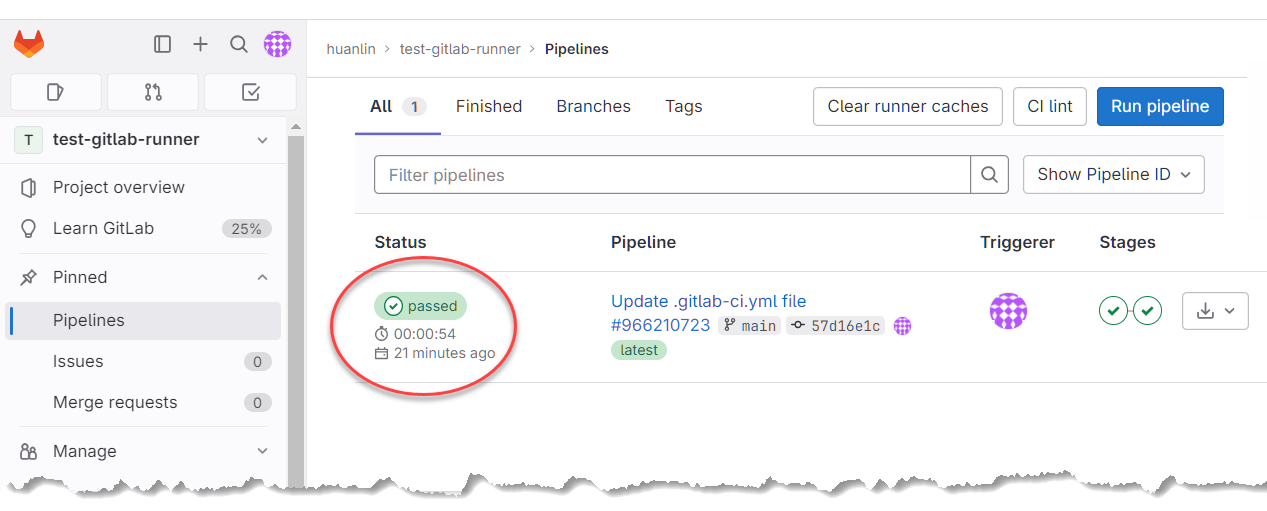
執行結果 passed 表示成功。點擊 passed 可查看進一步資訊:
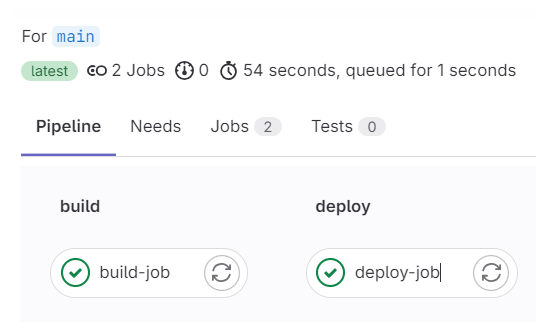
頁面顯示此 pipeline 的兩個 jobs 都成功跑完。個別 job 也可以點進去查看執行過程的詳細 log。底下是 build-job 的 log:
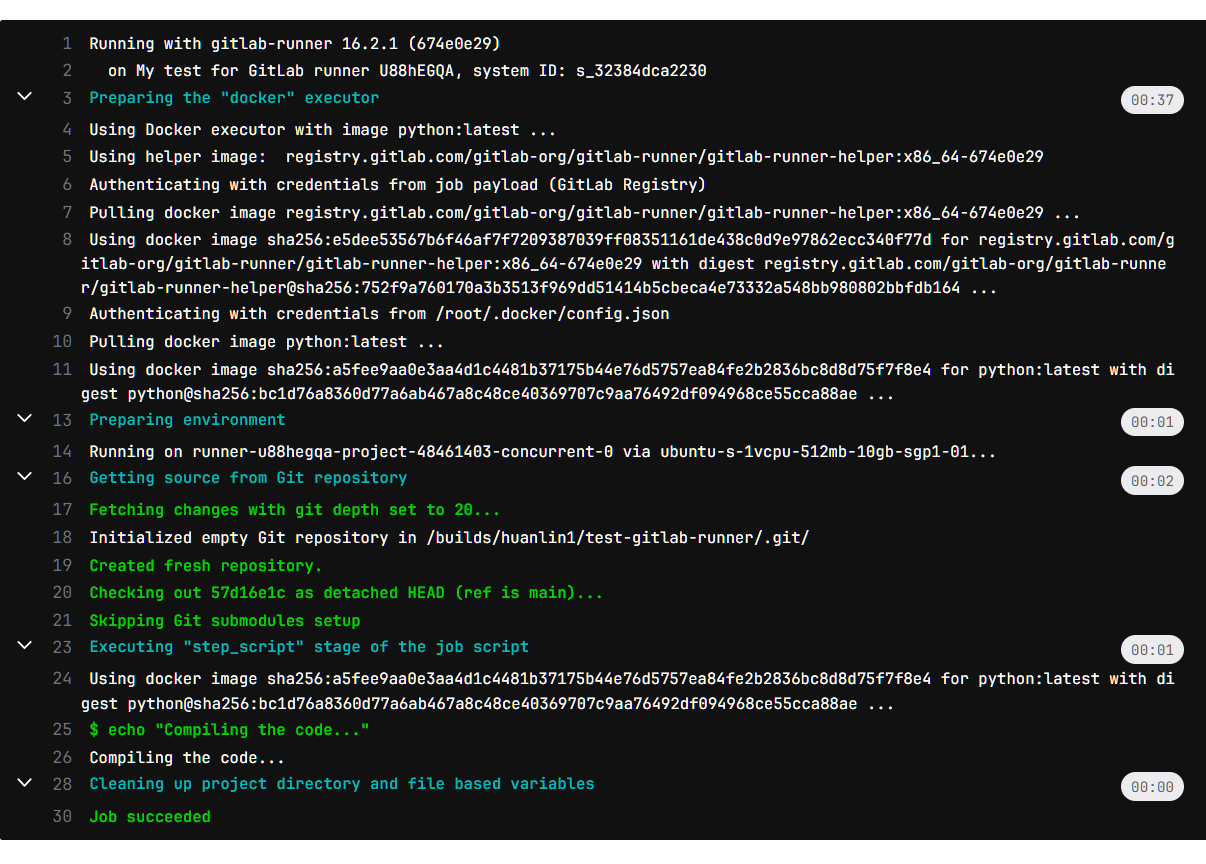
從 log 的第 1 行可以看到運行這個 job 的 gitlab-runner 版本是 16.2.1,第 2 行則可以看到先前註冊到此專案的專屬 runner 的描述和 ID。第 3 行則顯示此 job 實際執行的環境,是以 docker executor 來執行。
結語
GitLab 官方文件對於 GitLab runner 的說明還蠻清楚的,但如果沒有實際操作一番,恐怕還是不容易搞懂 runner 和 executor 各扮演什麼角色。我的理解是,runner 如同經紀人的角色,而真正執行工作、以及決定在何種環境下工作的是 executor。至於 tag 則是一種匹配或篩選 runner 的機制——用來確保特定 jobs 必定是由某個具有相同 tag 的 runner 來運行。
本文的練習是讓 GitLab runner 執行於 Linux VM,而實際執行 jobs 的是 docker executor。之後可以試試把 GitLab runner 安裝於 Docker 容器,或者改用 kubernetes executor 來執行 jobs。
延伸閱讀
本文未竟完善之處,請參閱以下相關文章:
- GitLab 官方文件
- GitLab CI 之 Runner 的 Executor 該如何選擇? by Cheng Wei Chen (艦長)
- CI/CD 系列 | 一文让你掌握 Gitlab Runner